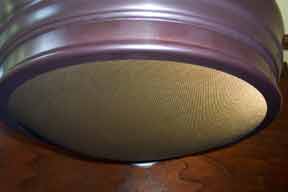
Replacing RCA Radiola Model 100 Speaker Grille Cloth
Written by Robert F. ChesarekPattern #60 is specifically designed for the model 100 speaker and has a very close resemblance to the original.
The materials you will need are as follows:
2 pcs. # 60 RCA-100 Grille cloth size 12" x 12".
1 Tube - Liquid Nails brand adhesive Type MP for home projects.
1 or 2 sheets of card stock or Manila folders
Pencil, scissors, and a fine tip marker.
The speaker rims will have to be stripped of the old grille cloth and felt dampener bands. Working from the back of the grille, begin by prying out the round spring wire retaining band which is located in the grove above the heavy screen. Find the end and use an awl, a dental pick or a thin flat blade screwdriver to pry it out of the groove and continue working your way around until it is free of the rim. This retaining band is coated with some kind of substance which has dried over time and may crumble off in the removal process. Next remove the screen. You will notice that there are two notched out areas on the flange of the screen which should align with two of the pins projecting from inside the rim. Starting at one of these notches, use your thin blade screwdriver to pry the screen up being careful not to bend or distort the screen and continue towards the other notch slowly working the screen out of the rim. If the screen has become distorted in any way, now is the time to flatten the rim or press out any dents in the dome.
Cloth removal is next and is simply a matter of scraping or cutting out the old grille cloth with a knife or sharp putty knife being careful not to mar the rims original finish if you are not planning on repainting it. After the old cloth is removed, scrape or sand any remaining traces of glue from the rims flange. If the felt dampener band is deteriorated use the same process to remove it also at this time.
Ok, you should now have the two rims stripped of old cloth and sanded clean. Before we start gluing the cloth, you will need to make the card stock or Manila reinforcement tabs that will be applied around the flange on top of the glued grille cloth. You may have seen these as you removed the original cloth. Using the edge of the dome screen, trace the outside edge of the screen on the card stock about half a circle. Then, using a drafting compass or some other manner of device, offset the line you have just made about a half inch wide. What you want to end up with is curved strips of stock approximately 2 to 4 inches long to go around both inside rims. At this time provided you have the new replacement grille cloth in hand and ironed flat, lay the rim upside down on the back of the grille cloth and using a fine point marker, trace a line around the outside of the rim marking a circle on the cloth.
This photo shows the small wrinkles which I was able to remove by pressing the screen outward from the inside.

Figure 1 The grille cloth with the rim outline
traced on the back of it.
I noticed a definite front and back to this cloth so be sure to choose the correct side as the front. Using scissors, cut the cloth into a circle along the line you have traced. Since I had repainted my speaker housing and rims, I opted to mask off the outer flange with blue masking tape to protect the finish. Lay the rim with the inside facing up on your work bench or the kitchen table covered with newspaper. Take the circle of grille cloth and lay it front side down inside the rim and work it around until it is more or less centered in the opening. The cloth will be slightly turned up on the inside of the rim for now. Once you have the cloth centered, fold back a portion exposing the inside rim being careful not to disturb the centering.

Figure 2.Pull back a small area and begin
gluing, being sure to keep the glue about an
eighth of an inch away from the inside edge.
Take your tube of glue and squeeze a small bead along a several inch section of the flat inside flange. Use your finger to spread the glue being careful to keep the glue away from the inside center of the flange opening. You want to keep the glue away from the edge or it may press out from under the cloth and be visible on the outside of the finished project. After the glue is spread, wipe off your fingers and start gently pressing the cloth down into the glue. Continue this process all the way around the rim pressing the cloth and working it at the same time to avoid any wrinkles on the flange and slightly pushing the cloth down in the center to allow some give when replacing the screen. It's hard to describe how much slack to allow in the cloth for the dome except to say that you do not want to pull it tight while gluing and you don't want to leave it too loose or you will have wrinkles in the finished project.

Figure 3. Begin gluing in the cardstock
reinforcing strips.
If you glue it down without enough slack in the center, you will not be able to press the screen into place. As a general rule, if you hold the rim up and allow the cloth to sag in the center, you should have a dome shape about half the size of the finished stretched dome. The photo shows the finished glued cloth and amount of looseness or free material in the center.

Figure 4. The completed reinforcing strips.
Now you can begin gluing the reinforcement strips on top of the fabric. Spread a small bead of glue on each strip and apply it to the cloth leaving some space between the strip and the inside edge of the opening. Continue gluing these strips all the way around the inside flange and trim the last one to fit in the remaining opening. Press these down snugly and allow the assembly to dry for 8 hours.
Once the drying time has elapsed, you can start to reassemble the rim. Using a mister bottle or a damp sponge, wet the cloth in the opening to allow it to stretch. Take the dome screen and place the part farthest away from the notches under the pin and down into the groove of the rim. Now slowly start working the screen down into the rim keeping the two notches aligned with the pins. Press the screen flange down and into the groove using your thumbs and working your way to the top. This will take some effort. Once the screen is pressed into the rim, replace the round spring retaining wire into the groove to hold the screen in place. Set the rim assembly aside to dry and allowing the cloth to stretch into shape.

Figure 5. The screen and retaining rim installed.
This photo shows the screen in place and the retaining ring installed. There are still some traces of the original glue stuck to the screen and ring. Photo does not show the felt dampener band installed around the inside of the rim where it contacts the speaker housing.
If you have installed the cloth too tight that the screen will not press into place, or you have left the cloth too loose and there are wrinkles your only option may be to tear it out and start over. On my first attempt, I had a little too much slack and developed a few small wrinkles as shown in the photo. I was able to press down the screen with my thumbs from the inside and reshape it enough to smooth them out a little.

Figure 6. This photo shows the small
wrinkles which I was able to remove by
pressing the screen outward from the
inside.
The second rim was glued down a little tighter and although I was able to force the screen into place, the material is stretched like a drum head. I hope that the glue and the cloth will endure the test of time, because this rim came out perfect as far as looks go.


